07 Oct 2015
Creating a data product with Flask, MongoDB, and IBM Bluemix
by Joe ClarkMy course in the business data analytics major, CIS 355, is intended to be “a hands-on introduction to working with data and creating systems that deliver data and analysis to decision makers”. This stems from the possibly unorthodox way I define the term “analytics”: for me, analytics implies creating data products to allow others to access data and analysis. Analyzing data, building models, and running algorithms is the domain of data scientists, but in order to call it “analytics” I require that the data, models, or algorithms are packaged in an automated system with some kind of a self-service interface.
So, while other courses in our new undergraduate program emphasize statistics, algorithms, and tools for crunching big data, I have designed CIS 355 around the engineering of data products or data apps.
Tool selection
The order in which I have tried to introduce data storage solutions is somewhat inspired by a 2x2 diagram I saw in an AWS sales pitch for cloud data storage a while back. What it allowed me to see was that relational databases (the typical starting point for teaching databases) are in fact most appropriate for the most complex queries on the most complex data structures, and that in fact we ought to teach budding data engineers to use other paradigms first—beginning with files, then nonrelational databases.
 Adapted from Managing Big Data in the AWS Cloud
To put together our first working “data product” we need two elements: (1) data stored in a database, and (2) a front-end application that can talk to the database server. With only 2.5 hours of classroom time per week, these have to be implemented as efficiently as possible. You could teach a whole semester-long course on databases, and more than one on app development (one for websites, one for mobile apps, one for BI dashboards, and more). Three categories of tools make it possible to get a useful data app up and running in no time flat:
-
Minimalistic web frameworks enable the rapid creation of fully-functional web services. Based on API-first development, these are HTTP services that transmit and receive JSON data. Because MVC frameworks separate code from presentation, students are not forced to figure out HTML, CSS, JavaScript or other Web technologies and can focus on data logic only.
-
NoSQL databases allow us to store data and retrieve it almost exactly as it is communicated to and from the web service. There is no need for an intermediate step to reconcile concepts with their constituent entities, as there would be if the back-end was a normalized RDB.
-
Cloud app development platforms allow us to deploy the database server and web application servers with a few clicks. In an academic setting, we tend to cover a lot of tools in a short amount of time, and are not able to be experts in any of them. Without cloud platforms I would need to be a sysadmin and configuration expert for MongoDB in week six of the course, PostgreSQL in week nine, Hadoop before the end of the course, as well as operating systems (students have Windows 7, 8, 10, OS X, and Linux computers), web servers (Apache, nginx), Python runtimes and other parts of the course’s infrastructure. With the cloud, I can learn to configure these components in a few hours, and show students how to deploy them in minutes.
The data product introduced below uses, specifically:
-
The Flask microframework for Python. It can implement a functioning HTTP web service in about a dozen lines of code (see here). Frameworks for other languages are available, but Python is used for a variety of tasks throughout several of our analytics courses, so it’s a natural choice here.
-
MongoDB provided by MongoLab (now mLab. A free “sandbox” deployment can be set up in a few clicks without entering a credit card.
-
IBM’s Bluemix (now IBM Cloud) app development platform. First time I’ve used it. I’m expecting Heroku-like ease of use, making it far more accessible to students than, say, Amazon Web Services. As part of IBM’s academic initiative, I can get licenses for my students to use it without having to enter credit card details—a major plus.
A ‘flinkedin’ web service
Our sample data product, flinkedin, is a database of profiles of employed people and their jobs. Its API allows us to retrieve user profiles by username or by company name. For now we will support just four URL endpoints:

Faking the web service with Flask on BlueMix
Once you get a Bluemix trial account and log in, you’ll see this Dashboard:
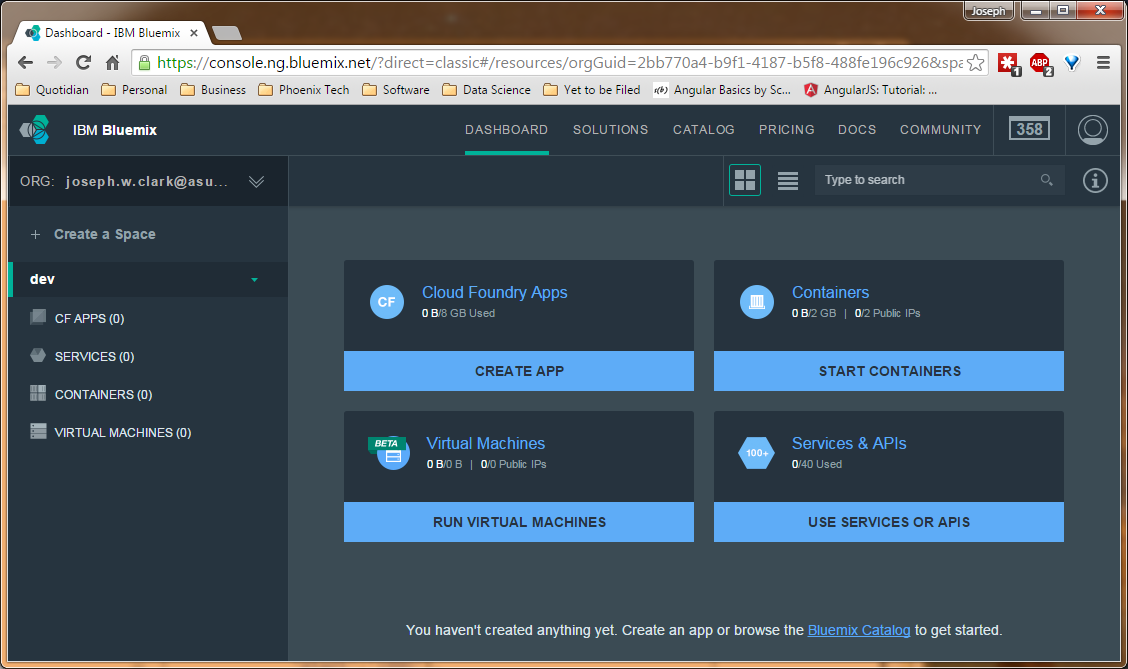 Bluemix dashboard
Your apps are organized into “spaces” (see the left side of the screen) and the default “dev” space for some reason didn’t give me permission to create apps. Two solutions are to modify the permissions (you need to click “Create a Space” and then find the “Manage Spaces” link) or to create a new, second space. Let’s assume you’ve figured that out, and are now looking at a “space” where you’re allowed to create apps.
We’ll use a Cloud Foundry app. Click “CREATE APP” and then “WEB” when asked. Under “How do you want to get started?” click the Python icon, “Continue”, and give your app a name. I’m calling mine flinkedin-clark, but yours must have a unique name of its own. When you click “Finish”, your application will be created, the server will be configured and started, and you’ll be able to monitor it on the Dashboard or even access it by browsing to its URL on the internet.
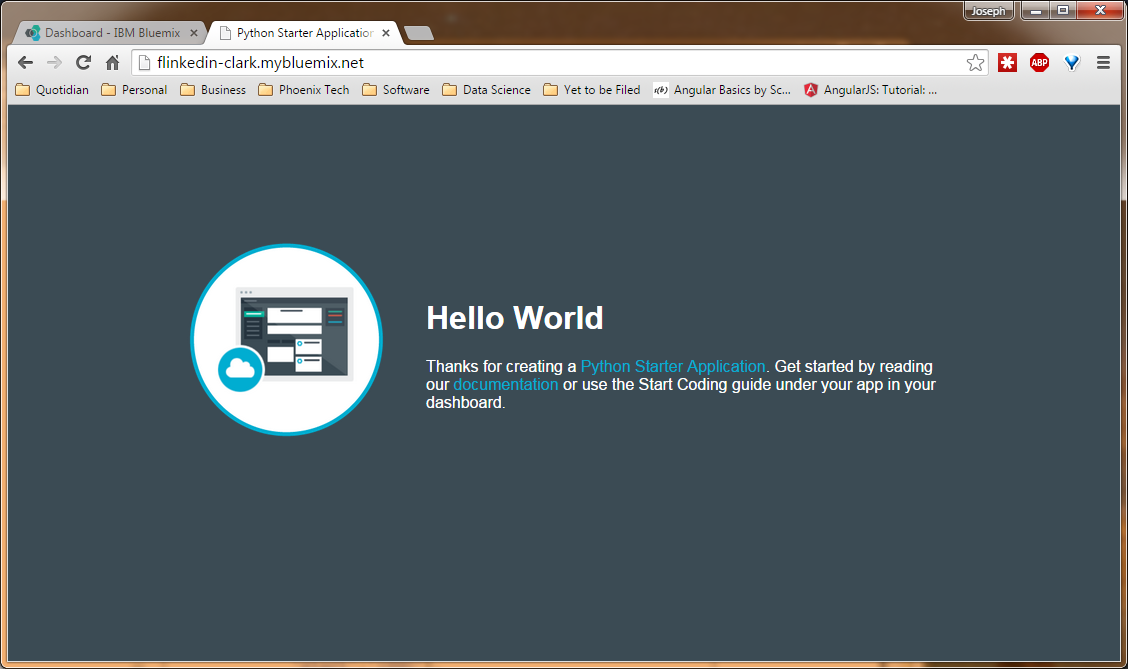 The starter app up and running at a real URL within two minutes of its creation.
You can actually edit the code right in the web browser, which (I hope) saves me from having to teach students how to use Git. After enabling Git, an “Edit Code” button appears on the app’s Overview dashboard.
 Note the “EDIT CODE” button next to the Git URL
To replace the starter app with our Flask app, we’ll need to change two files: requirements.txt, to tell the server which Python libraries we need available, and Procfile, which tells Bluemix what command to use to start the web server. We’ll also create a new file app.py containing our code.
The code below “fakes” the API. None of this data really comes from a MongoDB database, because we haven’t set one up yet.
Procfile:
web: python app.pyrequirements.txt:
    Flask==0.10.1
    Flask-SQLAlchemy==2.0
    Flask-WTF==0.12
    itsdangerous==0.24
    Jinja2==2.8
    MarkupSafe==0.23
    pymongo==3.0.3
    Werkzeug==0.10.4
    WTForms==2.0.2
app.py:
1
2
3
4
5
6
7
8
9
10
11
12
13
14
15
16
17
18
19
20
21
22
23
24
25
26
27
28
29
30
31
32
33
34
35
36
37
38
39
40
41
42
43
44
45
46
47
    import os
    from flask import Flask, jsonify
    app = Flask(__name__)

    @app.route("/", methods=['GET'])
    def hello_world():
        return( "Hello world. Try /api/profiles or /api/companies for data." )

    # listing all profiles
    @app.route("/api/profiles", methods=['GET'])
    def list_profiles():
        fake_data = { "profiles": [ {"name":"John McLane","id":"jmclane"},
                                    {"name":"James Edwards","id":"j"},
                                    {"name":"Samwise Gamgee","id":"samgamgee"} ]
                    }
        return( jsonify(fake_data) )

    # retrieve one profile
    @app.route("/api/profile/<string:id>", methods=['GET'])
    def one_profile(id):
        fake_data = { "profile": {"name":"John McLane","id":id,
                                  "jobs":[
                                    {"employer":"NYPD","position":"Lieutenant","start":1988}
                                  ]} }
        return( jsonify(fake_data) )

    # listing all companies
    @app.route("/api/companies", methods=['GET'])
    def list_companies():
        fake_data = { "companies": [ {"name":"NYPD"},
                                    {"name":"MIB"},
                                    {"name":"Bag End"} ]
                    }
        return( jsonify(fake_data) )

    # list all profiles for one company
    @app.route("/api/company/<string:company>", methods=['GET'])
    def one_company(company):
        fake_data = {   "company": company,
                        "profiles": [ {"name":"John McLane","id":"jmclane"},
                                    {"name":"James Edwards","id":"j"} ]
                    }
        return( jsonify(fake_data) )

    if __name__ == "__main__":
        port = int(os.environ.get("VCAP_APP_PORT", 5000))
        app.run(host='0.0.0.0', port=port)
After updating the code, click the Git icon on the left side of the screen (looks like a diamond with branching lines inside). Commit your code changes with a commit message, then click “Sync” to push the new changes into the repository. Now if you click the “BUILD & DEPLOY” button at the top right of the screen, you can watch your code being run, tested, and deployed to the live server over a span of a few minutes.
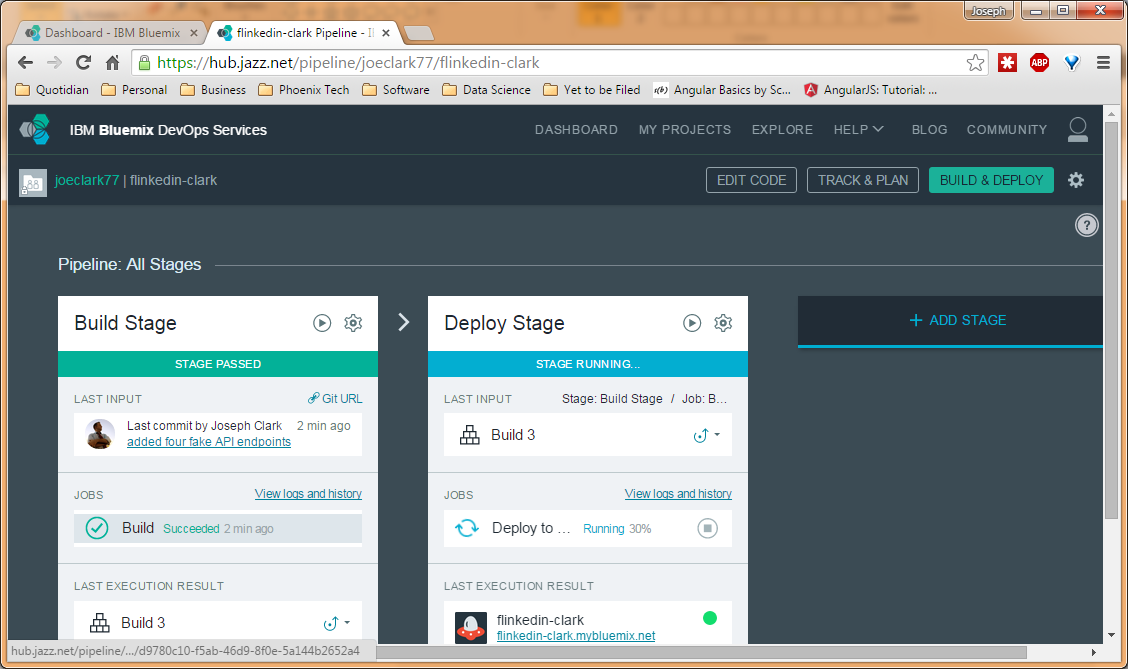 Bluemix has tested my update and is 30% of the way through deploying it.
When the update is fully deployed, you should be able to look at the app on the web and explore its defined URL endpoints.
Loading real data into MongoDB
If you sign up for an account on MongoLab, you can create a MongoDB deployment (a database server) from their list of options. The free version is a single-node deployment called the “sandbox” plan. Click on the name of the database in your “deployments” list and you actually get a very handy listing of the ways to connect to that database, either directly (using the mongo shell) or via an API.
We’ll use a Python library called PyMongo to connect to the database and issue commands (‘inserts’ and queries) via Python scripts, which we can automate. To connect to your database in any Python script, these four lines will do the trick:
1
2
3
4
5
6
7
8
9
10
    from pymongo import MongoClient

    # insert your connection details here
    MONGO_URL = 'mongodb://<dbuser>:<pass>@<database URL>'

    # connect to the MongoDB server
    client = MongoClient(MONGO_URL)

    # connect to the default database within the server
    db = client.get_default_database()
Just update the connection details with your username, password, and the database URL from MongoLab.
Before connecting our Flask app to this database, we need to get some data in there to be queried. This is a very unsatisfying piece of code that loads three profiles into the database:
1
2
3
4
5
6
7
8
9
10
11
12
13
14
15
16
17
18
19
    from pymongo import MongoClient
    # insert your connection details here
    MONGO_URL = 'mongodb://<dbuser>:<pass>@<database URL>'
    # connect to the MongoDB server
    client = MongoClient(MONGO_URL)
    # connect to the default database within the server
    db = client.get_default_database()


    db.profiles.insert( {"_id":"jmclane","name":"John McLane",
                         "jobs":[{"employer":"NYPD","position":"Lieutenant","start":1988}]
                        } )
    db.profiles.insert( {"_id":"j","name":"James Edwards",
                         "jobs":[{"employer":"NYPD","position":"Officer","start":1990},
                                 {"employer":"MIB","position":"Agent","start":1997}]
                        } )
    db.profiles.insert( {"_id":"samgamgee","name":"Samwise Gamgee",
                         "jobs":[{"employer":"Bag End","position":"Gardener","start":1954}]
                        } )
In practice, you’d want to extract the data from some source system, or perhaps load a few hundred randomly-generated profiles, in order to really show off the capabilities of the app. At any rate, we’ve got some data now, so we can turn the fake Flask app into a real one.
Integrating Flask with MongoDB
Now we update app.py. The first change is to add the four-line MongoDB connection code near the top, as well as this line: from bson import json_util (This loads a function, json_util, which is helpful in formatting the query result as text to send the user.)
Then, for each endpoint, replace the fake data with a real MongoDB query, and return the result. The finished code looks like:
1
2
3
4
5
6
7
8
9
10
11
12
13
14
15
16
17
18
19
20
21
22
23
24
25
26
27
28
29
30
31
32
33
34
35
36
37
38
39
40
41
42
43
44
45
46
    import os
    from flask import Flask, jsonify
    app = Flask(__name__)

    from pymongo import MongoClient
    # insert your connection details here
    MONGO_URL = 'mongodb://<dbuser>:<pass>@<database URL>'
    # connect to the MongoDB server
    client = MongoClient(MONGO_URL)
    # connect to the default database within the server
    db = client.get_default_database()
    from bson import json_util

    @app.route("/", methods=['GET'])
    def hello_world():
        return( "Hello world. Try /api/profiles or /api/companies for data." )

    # listing all profiles
    @app.route("/api/profiles", methods=['GET'])
    def list_profiles():
        real_data = db.profiles.find()
        return( json_util.dumps({"profiles":real_data}) )

    # retrieve one profile
    @app.route("/api/profile/<string:id>", methods=['GET'])
    def one_profile(id):
        real_data = db.profiles.find({"_id":id})
        return( json_util.dumps({"profile":real_data}) )

    # listing all companies
    @app.route("/api/companies", methods=['GET'])
    def list_companies():
        data = db.proiles.distinct("jobs.employer")
        return( jsonify({"companies":data}) )

    # list all profiles for one company
    @app.route("/api/company/<string:company>", methods=['GET'])
    def one_company(company):
        data = {"company": company,
                     "profiles": list(db.profile.find({"jobs.employer":company},{"name":1}))
                    }
        return( jsonify(data) )

    if __name__ == "__main__":
        port = int(os.environ.get("VCAP_APP_PORT", 5000))
        app.run(host='0.0.0.0', port=port)
Commit the code changes, sync the git repository, and wait for the code to deploy. Does it work?
Conclusions
This is the first time I’ve used Bluemix, so I’m reflecting a bit on how it went. The students found it easy to set up and easy to enter their discount codes. These were provided by the IBM Academic Initiative, and they allow us to use the Bluemix platform without asking students to enter their credit card details — this was a major obstacle to using other cloud platforms in past semesters.
I didn’t like the browser-based editor, because unfortunately it didn’t hide any of the complexity of using Git. After editing code in the browser, students still had to find a Git tab, figure out how to make a commit, and then push or sync the commit (to where? from where? I don’t find it easy to intuit how many environments or staging servers are even present.). If I had my druthers, I’d replace the whole Git interface with a big button labeled “Sync” or “Update” that would automatically commit all changes and deploy the new version. This would not be recommended for professional app developers, but could make things much less complex for students as well as folks like data scientists who are doing lots of one-off scripts and prioritize rapid iteration over quality control.
Overall, Bluemix works a lot like Heroku. For anything professional, I’d use command-line Git with either of those two cloud platforms. Both are simpler to use than AWS’s Elastic Beanstalk, primarily because of the smooth Git integration and the opacity of configuration details.
MongoLab as a provider for the database is as smooth as butter. I highly recommend their service and cannot think of any way to improve it. Perhaps an in-browser mongo shell, so I don’t have to install the client on my computer?